• Skip to content
  • Skip to primary sidebar
  • Skip to footer

Sea Sky & Table

a travel company exploring the intersection between people, food and and the world we live in

  • Home
  • Travel
    • Travel Imagery
  • Food
    • Recipes
    • Food Imagery
    • Food Videos
  • Architecture
    • Galleries: Real Estate
    • Homeowner Guidelines
    • Galleries: Commercial
    • Houzz Profile
    • Terms & Conditions
  • Blog
  • About
You are here: Home / Archives for food

food

Farm-to-Table Dining by celebrity chef Michael Schwartz in Downtown Miami

July 18, 2017


Celebrity chef, Michael Schwartz, recently opened his latest restaurant in the epicenter of Miami’s young professional community.

Forget the drive to the Design District, or to mid-town, or the hassle of parking.  Hop on the Metro Mover to Brickell Station and meet for lunch at Fi’lia, in the chic new SLS Brickell Hotel.  It’s signature Michael Schwartz – fresh, farm-to-table fare, bringing new twists to standard fare, only this time, it’s Italian-style.

Personal touches abound.  At each teak table, pewter salt and pepper shakers flank small clay pots of fresh oregano.  Larger herb pots line walls and windows vertically, from ceiling to sill.  Waiters flavor Chef Michael’s branded olive oil with herbs snipped tableside to accompany aromatic crusty bread, served fresh out of the oven.

Caesar salad is prepared tableside, with fresh, grilled croutons.  Beef carpaccio is served with almost equally thin fried potato crisps and salad.  

Pizzas are designed with an imaginative palate an cooked in a brick oven hearth on the far side of the teak an stainless steel bar. Comfort food gets healthy with cauliflower gratin.  Heartier fare, like homemade sausage, roast lamb, wood-grilled chicken, and grilled giant prawns, sates the most voracious appetites.

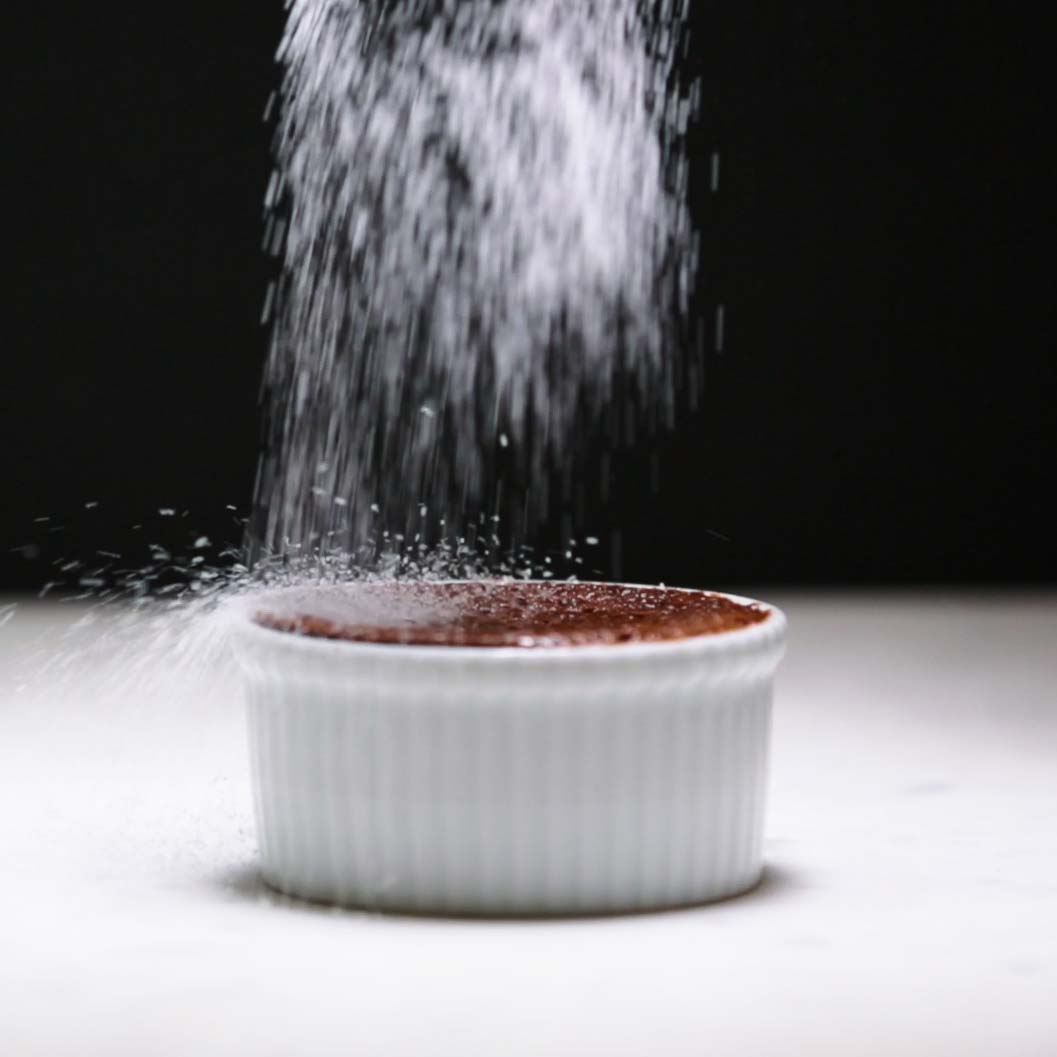
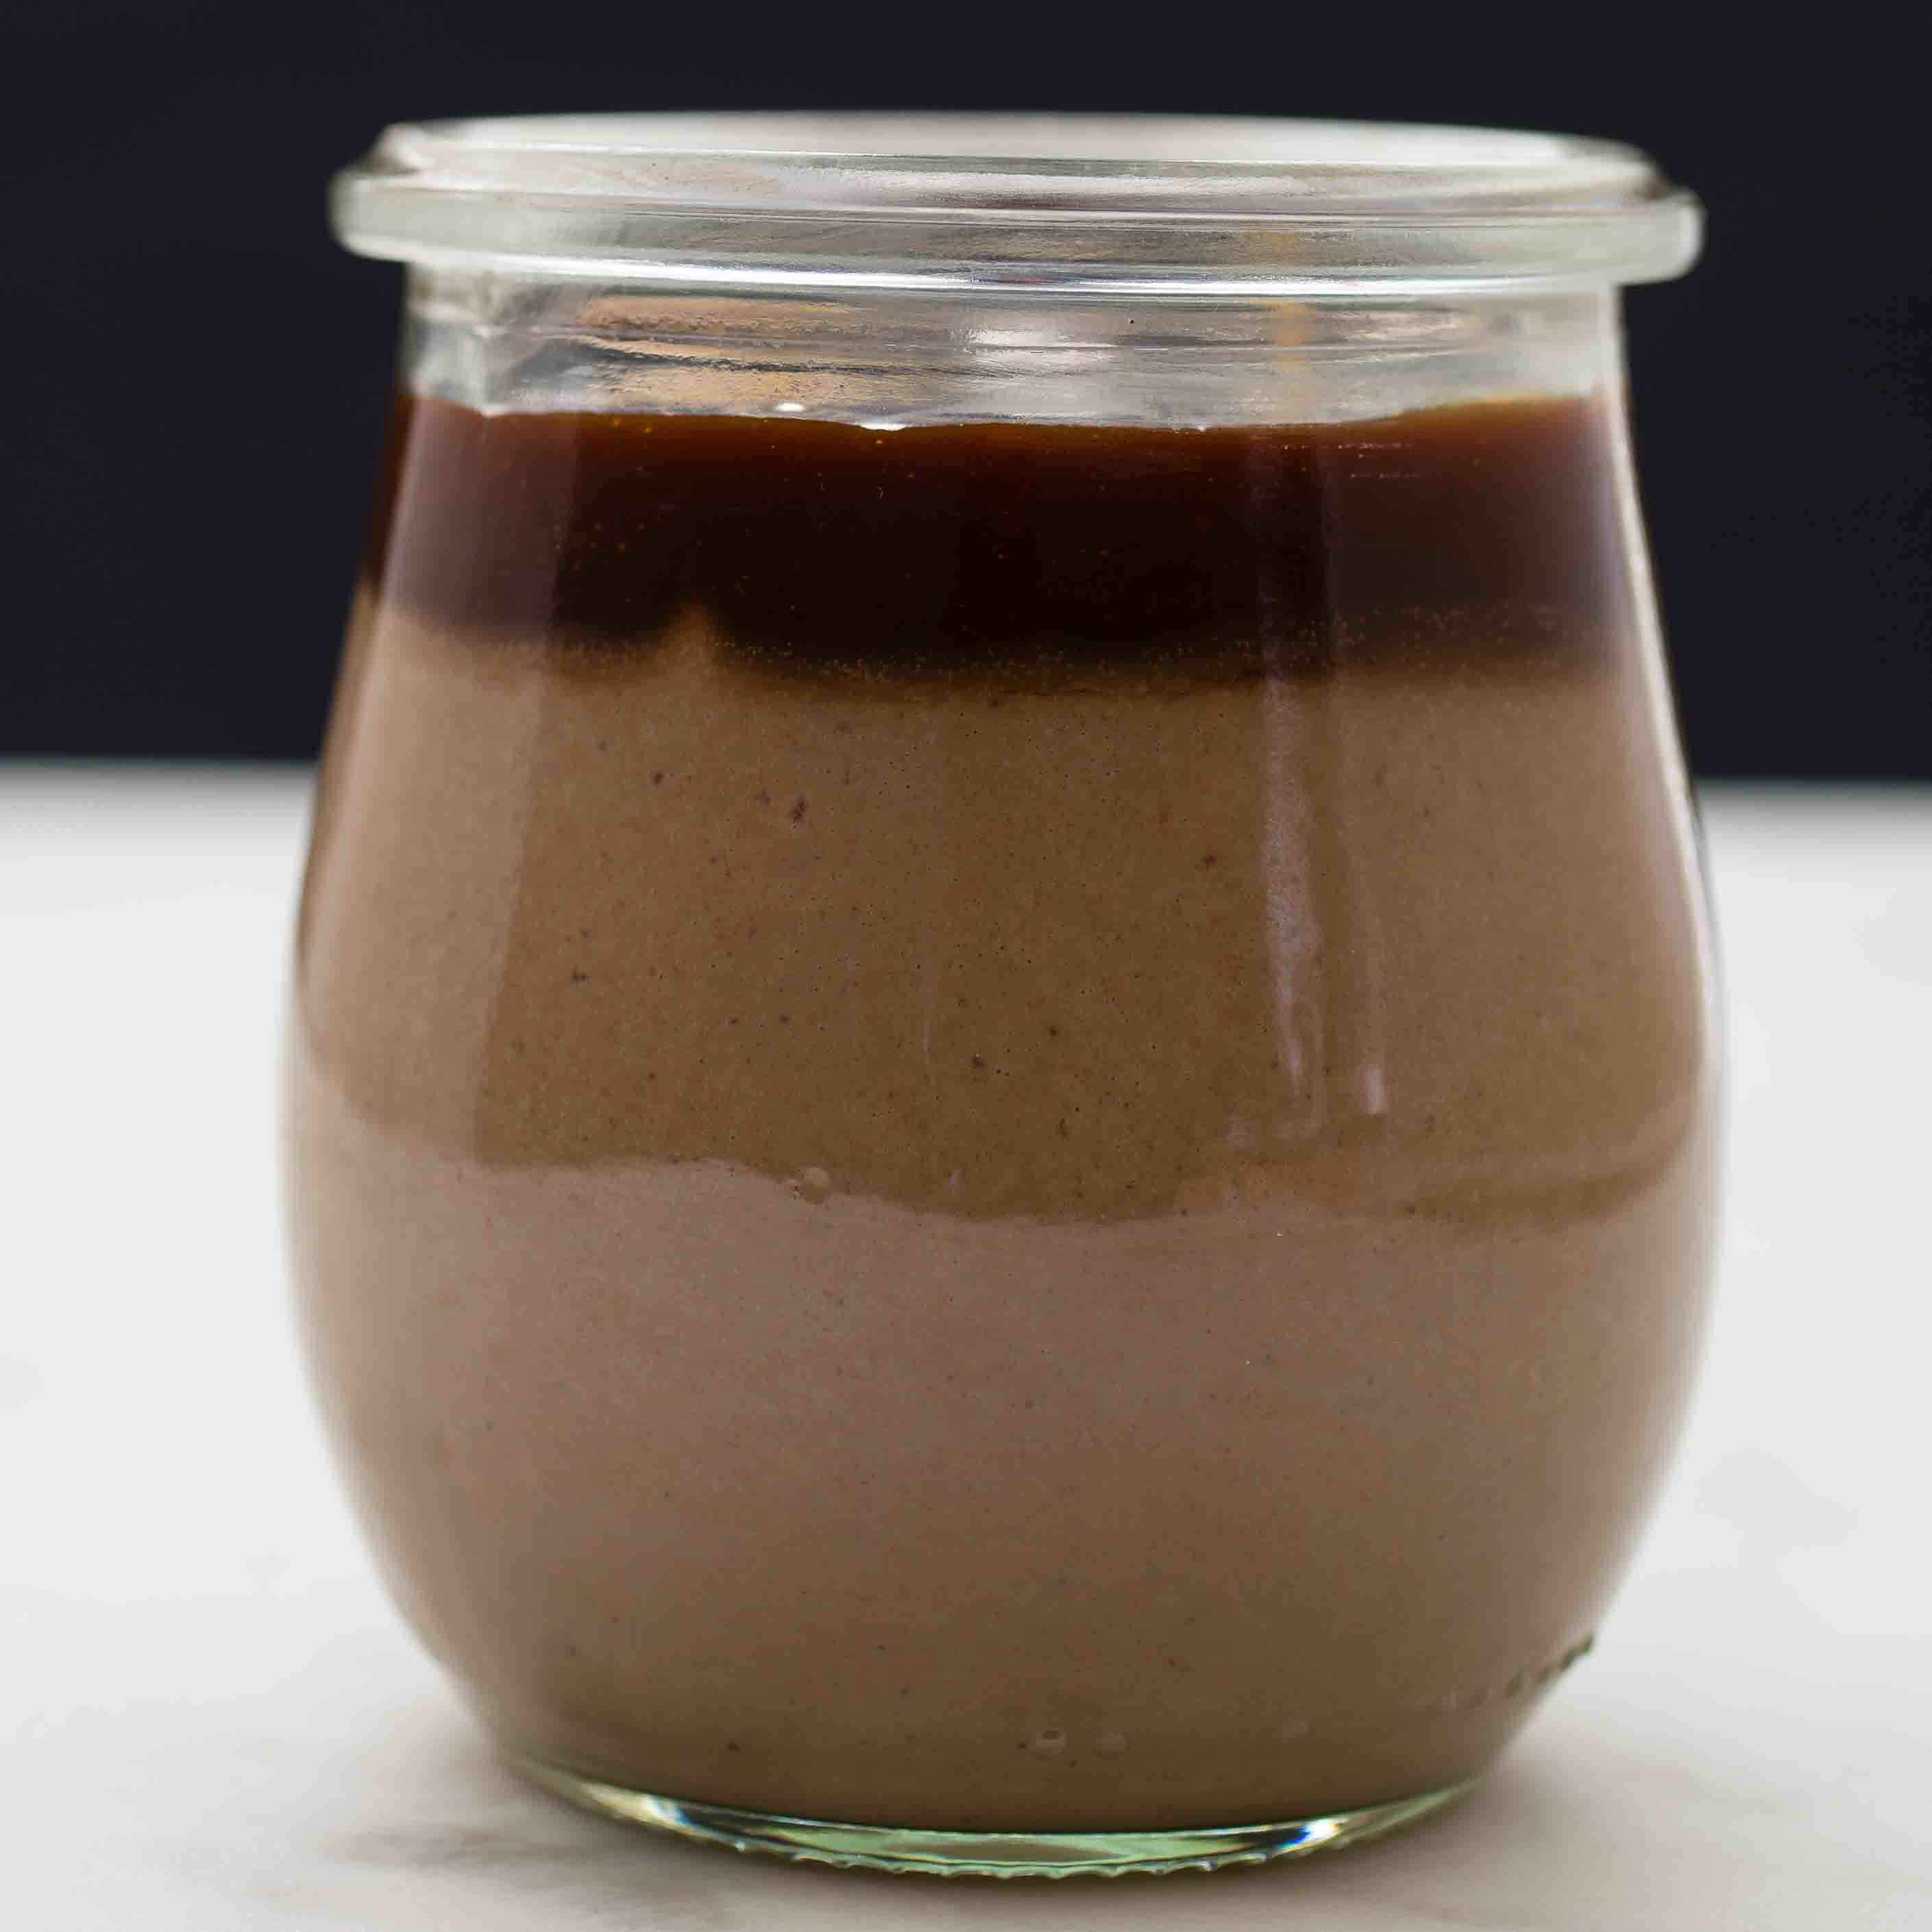
Leave room for dessert, though.  “Chocolate budino” may translate to plain old chocolate pudding, but this version is deeply dark, topped with salted butter caramel, a dollop of flavored whipped cream, and brandied cherry cookies.  There’s also a pine nut and honey tart with bitter orange, creme fraiche and rosemary; an olive oil cake with fig compote and zabaione; and a selection of gelato sandwiches.

Zagat, Time-Out Magazine, and Miami New Times have all described Fi’lia as one of the hottest new restaurants in Miami.  If Chef Michael’s other restaurants are any indication – Michael’s Genuine Food, Ella, Harry’s Pizza, The Restaurant at the Raleigh, and Cypress Tavern – downtown residents and commuters alike are in for a treat.

Filed Under: Food Tagged With: brick oven, dine, downtown, eat, Fi'lia, food, Miami, Michael Schwartz, resaurants, SLS Brickell

Chocolate Creme Brulee

June 18, 2017

https://seaskyandtable.comwp-content/uploads/2017/07/5144_Choc-Creme-Brulee-2nd-half-fast-fwd.mp4

After a friend recommended the movie “Paris Can Wait,” with Diane Lane, I simply had to indulge her and her husband with a Chocolate Creme Brulee at our weekly dinner.  This recipe is from Chocolate Epiphany by Chef Francois Payard (with delectable photography by Rogerio Voltan).  We were only 4 persons, and I only had 4-ounce (not 6-ounce) ramekins, so I halved Chef Payard’s ingredients.  You might try reducing the sugar just a bit further.  

Chocolate Creme Brulee
2017-07-18 14:18:12
Serves 4
Easier to make than you think, this chocolate version of a French classic can be made a day or two ahead and refrigerated until ready to serve.
Write a review
Save Recipe
Print
Ingredients
  1. 6 oz 72% chocolate, chopped
  2. 1/3 cup sugar
  3. 4 large egg yolks
  4. 3 c/ plus 3 tbsp. heavy cream
Instructions
  1. Preheat the oven to 300 degrees.
  2. Arrange 4 four-ounce ramekins in a shallow baking pan (like an 8" x 8" brownie pan).
  3. Place approximately a quart of water to boil.
  4. In a stand mixer, whisk the eggs until yellow and thicker than when they came out of the shell. Add the sugar and continue to whisk until thick and pale yellow.
  5. In a medium saucepan, heat the milk until bubbles form at the edges of the pan (just before it boils). Remove from heat and stir/whisk in the chocolate until it is melted and the mixture is smooth.
  6. Take a ladel-ful of the chocolate mixture and very slowly, drizzle it into the egg mixture to temper the eggs, whisking constantly to keep the eggs from curdling.
  7. With the whisk on medium, slowly pour in the rest of the chocolate mixture into the egg mixture, until everything is combined.
  8. Strain the custard through a fine sieve into a pitcher. At this point you can cover and refrigerate the mixture for up to 2 days.)
  9. Divide the mixture evenly among the ramekins.
  10. Take the boiling water and pour it into a 4-cup Pyrex measuring cup with spout.
  11. Place the ramekins in the oven.
  12. Carefully pour the water into the shallow baking pan until it reaches approximately halfway up the sides of the ramekins.
  13. Bake the custards for 1 hour, until the custard is just set.
  14. Remove from the oven and cool to room temperature.
  15. Referigerate the ramekins until the custard is completely set and chilled, at least 3 hours or up to 2 days.
  16. FINISH THE DESSERT: With the ramekins on a baking sheet, spread the top of each custard with an even layer of about 1 tablespoon sugar. Burn the sugar with a kitchen torch until it forms a crisp, caramel-colored crust, being careful not to scorch the chocolate.
Notes
  1. Chef Payard recommends using dried brown sugar (as regular brown sugar out of the box has too high a moisture content to caramelize). To dry brown sugar, place the sugar on a baking sheet and dry it in a preheated oven at 200 degrees Farenheit for about 1 hour. Transfer the sugar to a bowl fitted with the paddle attachment and mix on low to break up the lumps.
Adapted from Chocolate Epiphany by Francois Payard
Sea Sky & Table https://seaskyandtable.com/

Filed Under: Food, Recipes: Sweet Tagged With: caramel, chocolate, creme brulee, custard, dessert, food, french, sweet

Chocolate Pot de Crème for Two

May 16, 2017


So many recipes are designed for a large family or small dinner party. As the nest empties – or before it grows – here is an easy recipe for Chocolate Pot de Crème for two adapted from Paris: Authentic Recipes Celebrating the Foods of the World from the Williams Sonoma collection.

Chocolate Pot de Creme for Two
2016-08-02 05:30:50
An easy recipe for Chocolate Pot de Crème, tailored for two servings. Top it with a thin layer of salted butter caramel (see post of same date) and a dollop of whipped cream.
Write a review
Save Recipe
Print
Ingredients
  1. 1/3 c. milk
  2. 1/4 c. cream
  3. 1/4 c. sugar (omit if using a sweetened chocolate like Chocolat-Menier)
  4. 2 oz best quality bittersweet chocolate, chopped into small pieces
  5. 1/2 tbsp. unsweetened cocoa powder
  6. tiny pinch of salt (think 1/4 of a pinch used for the version that serves 8)
  7. 1 whole egg, whisked
  8. 1/4 tsp. vanilla
  9. heavy cream or whipped cream for garnish
Instructions
  1. Preheat the oven to 350 degrees.
  2. Place a kettle of water to boil for the bain marie.
  3. In a heavy saucepan, over low heat, combine the milk, cream and sugar and stir until bubbles form at the edges.
  4. Remove from heat and stir in both chocolates and the salt and stir until smooth.
  5. Return to medium heat and stir constantly until small bubbles form at the edges (approximately 3-4 minutes).
  6. Remove from heat.
  7. in a separate bowl containing the whisked egg, whisk a few spoonfuls of the chocolate mixture to temper the egg without cooking it. Whisk in a few more spoonfuls, then slowly pour and whisk the egg mixture back into the saucepan with the chocolate mixture. Stir in the vanilla.
  8. Pour the mixture into two 3-1/2-inch ramekins, filling them almost to the top.
  9. Place the ramekins in a brownie pan and surround the ramekins with hot water from the kettle. Cover the pan with aluminum foil.
  10. Bake until the edges are firm but the centers tremble slightly (or until a thin knife inserted in the center comes out clean).
  11. Remove from the water bath, cool, wrap, and refrigerate fro 2 hours or 2 days.
  12. Serve cold. Garnish with whipped cream or just create a tiny well in the center with a knife and pour a splash of heavy cream into the center.
Notes
  1. In a pinch, I have substituted evaporated milk for the cream and been quite pleased with the results. We often use Chocolate Menier, a bar brand used for making hot chocolate, because it's what we have in the house; and Ghiradelli cocoa powder.
Adapted from Williams Sonoma's Paris
Sea Sky & Table https://seaskyandtable.com/

Filed Under: Food, Recipes: Sweet Tagged With: chocolate, custard, dessert, food, french cuisine, pot de creme, sweet

Salt Butter Caramel II

May 15, 2017

This version of Salted Butter Caramel is adapted from David Lebovitz’ My Paris Kitchen.  It trades some of the water used in the caramelization process for more cream.   Try it as a thin layer on chocolate pots de creme with a dollop of flavored whipped cream as seen on Fi’lia’s menu.


Salt Butter Caramel
2016-11-29 10:20:44
Yields 1
This version emphasizes the taste of burnt sugar and is a delicious complement to chocolate desserts.
Write a review
Save Recipe
Print
Ingredients
  1. 1 c. sugar
  2. 1/4 c. water
  3. 6 tblsp butter, cubed, at room temperature
  4. 3/4 c. heavy cream
  5. Sea salt
Instructions
  1. Arrange the sugar evenly across the bottom of a large skillet.
  2. Sprinkle the water evenly across the sugar.
  3. Heat the sugar and water over medium heat. Stir with a wooden spoon only enough to get the bits to melt evenly, no more. Watch carefully and be very careful as sugar heats to a much higher temperature than water or other liquids and can burn badly.
  4. At the point where the caramel turns dark amber and just begins to smoke, remove the pan from the heat.
  5. Place the butter cubes carefully into the pan and whisk until melted, being careful not to splatter.
  6. Gradually whisk in the cream, stirring until the caramel is smooth. If there are bits of sugar or caramel that refuse to melt, warm the pan on low head and loosen with a wooden spoon until incorporated.
  7. Serve with a few crystals of sea salt.
Notes
  1. Keep up to 2 weeks in the refrigerator.
  2. If the caramel needs to be thinned, rewarm with a bit of cream or milk.
Adapted from My Paris Kitchen by David Lebovitz
Sea Sky & Table https://seaskyandtable.com/

Filed Under: Food, Recipes: Sweet Tagged With: butter, caramel, dessert, food, salt, sauce, sea salt, sugar, sweet

Coconut Clementine Cake with Chocolate Glaze

April 16, 2017

This recipe is adapted from Melissa Clark’s Ambrosia Cake published in the New York Times on April 7, 2017 just before Easter and the recipe for Chocolate Glaze in Larousse on Pastry.  The search for a dessert for Easter dinner began with a desire for something frosted in white, garnished with coconut and strewn with edible flowers.  Melissa’s cake seemed perfectly adaptable.  I would use whipped cream instead of the marshmallow frosting, and edible flowers in lieu of strawberries.

When I couldn’t find edible flowers in any of our local South Florida grocers, the dried edible rose petals I had on hand  seemed like a good substitute – at first.  But neither the coconut nor the clementines seemed palatable with dried rose petals; and, quite simply, I began to crave chocolate to compensate for not being able to realize my vision.

At first, I thought I would use a clementine-flavored chocolate ganache and clementine sections as the filling.

But the bulk of the clementine sections would have made the cake appear lumpy once a second layer was placed on top.

So, the bottom layer became the top layer and the entire cake was enveloped in chocolate.

Delicious!  It helps to use fresh coconut, but it’s not a must.  The clementines must be sweet.  

Melissa Clark crafted a lovely flavor combination in the cake.  Enveloped in chocolate, garnished with clementine sections and edged in flaked fresh coconut, the layers of flavor will make you stop and savor the moment.    

Coconut Clementine Cake with Chocolate Glaze
2017-05-07 09:48:24
Sweet clementines, fresh coconut and chocolate make this cake fresh and satisfying. Sugar is already reduced from the original recipes. If you prefer a 4-layer cake, bake the cakes 1-2 days ahead, follow the instructions for refrigeration, and be sure to slice through the layers horizontally when the cake is nice and cold.
Write a review
Save Recipe
Print
Ingredients
  1. CAKE
  2. =====
  3. 2-3/4 c. flour
  4. 1 tbs. baking powder
  5. 1/2 tsp fine sea salt
  6. 1/2 c. whole milk
  7. 1/2 c. unsweetened coconut milk
  8. 1 tbs. dark rum (or 1 tsp coconut extract)
  9. 1 tsp. vanilla extract
  10. 12 tbs. (1-1/2 sticks) unsaltened butter, softened
  11. 1/4 c. virgin coconut oil, melted and cooled (or butter)
  12. 1 c. LESS 1 heaping tbs. sugar
  13. 4 large egs, room temperature, whites & yolks separated
  14. 1-1/4 tsp finely grated clementine zest (about 2 clementines)
  15. FROSTING
  16. =========
  17. 8 oz bitter chocolate (70% Lindt Dark Chocolate works well)
  18. 2 tbsp butter
  19. 1 c. LESS 2 tbsp. whole milk
  20. 2 tbsp. heavy cream (or creme fraiche)
  21. 1-3/4 tbsp. sugar
  22. Juice from 2 clementines, strained
  23. GARNISH
  24. ========
  25. Clementine sections, cleaned of the veins (about 2 more clementines)
Instructions
  1. CAKE: Heat oven to 350 degrees.
  2. Butter two 9-inch cake pans and line the bottom with parchment paper.
  3. In a medium bowl, whisk together the dry ingredients.
  4. In a separate bowl, whisk together the milk, coconut milk, rum, and vanilla.
  5. In the bowl of an electric mixer, beat butter, coconut oil, and sugar together until light and fluffy, about 3 minutes.
  6. Beat in egg yolks, one at a time, then beat in the zest.
  7. Beat in half the flour mixture, followed by half the milk mixture. Repeat, beating just until combined and scraping down the bowl as necessary.
  8. In a separate bowl, use an electric beater to whisk the egg whites, just until stiff peaks form. Fold into the cake batter.
  9. Divide the batter between the 2 pans. Bake until lightly golden brown and a toothpick inserted in the center comes out clean, about 30 minutes. Transfer pans to a wire rack to cool 10 minutes, then unmold the cakes and cool completely on the rack. (Cakes can be made up to 2 days ahead. Once cool, remove the parchment paper, wrap in plastic and refrigerate. This makes it much easier to slice the 2 cakes into 4 layers.)
  10. FROSTING: Bring water to simmer in a double boiler. Break the chocolate into pieces and place in the top part of the double-boiler . Gently melt, stirring with a wooden spoon.
  11. Cut the butter into small pieces. Add to the warm chocolate and mix gently until smooth and creamy.
  12. Put the milk in a small saucepan, and bring to the point where small bubbles form at the edge of the pan. Remove the saucepan from the heat and add the heavy cream, sugar, and clementine juice. Whisk well and bring back to a gentle simmer. (Do not boil.)
  13. Pour the contents of the saucepan into the chocolate mixture, whisking constantly until smooth. Pour into a large measuring cup with a pouring spout, or into a pitcher.
  14. Pour slowly over each layer, beginning from the center and circling into gradually widening circles. When working on the top of the cake, work quickly, before the frosting hardens, to flatten with a long offset spatula.
  15. Decorate with clementine sections.
Notes
  1. About the chocolate... I used to think that the higher the percent of cocoa solids the better. But when I began using 85% and 90% dark chocolate, my chocolate glazes became grainy. At first, I thought it might be the brand. I switched from Ghiradelli to Lindt. But the results remained grainy. Finally, one day, I went back to 70% dark chocolate and voila! Perfection! Irrespective of brand. I guess there is such a thing as too much of a good thing.
Adapted from Melissa Clark & Larousse on Pastry
Sea Sky & Table https://seaskyandtable.com/

Filed Under: Food, Recipes: Sweet Tagged With: cake, chocolate, clementine, coconut, dessert, food, glaze, orange, sweet, tangerine

Functional Foods: Turmeric & Herbed Eggs (Kuku)

August 5, 2016

Hearing the words “turmeric” and “anti-inflammatory” in the same sentence was enough to put me on an experimental roll.  My mother has rheumatoid arthritis.  Functional foods that help prevent a recurrence of the pain and swelling – and keep her off of the steroids that induce what I unscientifically refer to as “Mighty Mouse” syndrome – are worth incorporating into our repetoire.  

Coincidentally, I tired of Caribbean cooking.  Somehow, everything tasted like adobo or a package of pre-mixed seasoning with achiote, the ground seed that gives color to arroz con pollo.  Not that these Latin staples aren’t wonderful.  They are.  I grew up on them, loved them, depended upon them for years to deliver the base for many of my family’s favorite dishes.  It was just that, these days, every time I tasted a dish using them, that was all I tasted.  It was predictable.  I was bored with the flavors.

The first thing to know about turmeric is that it stains everything.  So did achiote.  Would turmeric work in Spanish rice?  Yes!  The flavor is not identical, but I like it.  It has depth, it’s different, it’s satisfying, and the cilantro provides reassurance, that yes, this is home.  Turmeric works in red beans and black beans as well.  

That was the end of my experimentation … for a while.

Then, I discovered a cookbook with a plethora of delicious recipes, many of which used turmeric, and many of which were are vegetarian. 

A few months ago, my cousin’s husband, Terry, a communications professor, mused aloud that he’d like to travel to Iran.  He is one of the more adventurous travelers I know.  His wife sings in a chorus that travels.  Between his business and her singing, they hike, sing, and lecture overseas several times a year.  

Soon after, a woman I once worked with and always admired, Phyllis Stoller, who runs the Women’s Travel Group out of New York, announced her company was organizing a trip to Iran.  Intriguing.   

Around the same time, Check Please, our local public television food show, raved about a local Persian restaurant, offering an easy and affordable way to satisfy our culinary curiosity.  The food was, as promised, delicious.  The restaurant even had a little section with Persian spices for sale.  The quest to replicate some of the dishes at home led me to Joon, Najmieh Batmanglij’s wonderfully approachable book of everyday Persian recipes.  Many are vegetarian and many feature turmeric.

What followed was a month of sharing and photographing recipes from the book, including:

  • Kuku, an egg-based dish where the eggs are a simply a vehicle for holding an abundance of vegetables or greens together, laced with fragrant spices;
  • Turmeric & Lime Roast Chicken, with a beautiful deep golden color and a citrus kick;
  • Turmeric & Ginger Chicken Soup, comforting and healthy; and
  • Saffron Basmati Rice, with a crunchy layer of rice  (tah-dig) mixed with saffron, yogurt, and olive oil.  (I added turmeric to this, too.)

My favorite is Kuku Sabzi.  It is quite appropriately a rite of spring.  Overflowing with greens and herbs and flavored with advieh, a dried spice mix that includes rose petals, it is healthy and heady.  Glistening garnet-colored barberries sauteed quickly in a splash of olive oil provide a jewel-like garnish.

Here’s a quick video followed by the recipe.

Joon!  (Enjoy!)

Turmeric & Herbed Baked Eggs (Kuku Sabzi)
2016-08-04 21:14:17
This dish celebrates spring with an abundance of fresh herbs and a dried spice mix that features dried rose petals.
Write a review
Save Recipe
Print
Ingredients
  1. CARAMELIZED ONIONS
  2. ====================
  3. 4 tblsp olive oil
  4. 2 medium yellow onions, peeled and finely chopped
  5. GARNISH
  6. ========
  7. 1 tblsp olive oil
  8. 1/3 c. dried barberries, soaked in cold water for 15 minutes, and drained
  9. 1 tsp grape molasses or sugar
  10. 2 tblsp water
  11. BATTER
  12. =======
  13. 6 eggs
  14. 1 tsp baking powder
  15. 1 tblsp advieh (Persian dried spice mix, see Notes, below)
  16. 1-1/2 tsp sea salt
  17. 1 tsp freshly ground black pepper
  18. 1/2 tsp turmeric
  19. 2 cloves garlic, peeled and finely chopped
  20. 1/2 c. finely chopped Romaine lettuce
  21. 1/2 c. finely chopped spring onions (green and white parts)
  22. 1/2 c. finely chopped fresh parsley
  23. 1/2 c. finely chopped fresh cilantro
  24. 1/2 c. finely chopped fresh dill weed
  25. 1 tblsp dried fenugreek (optional)
  26. 1/2 c. coarsely chopped walnuts
  27. 1 tblsp rice flour
  28. 4 tblsp olive oil, for cooking kuku
Instructions
  1. Preheat oven to 400 degrees Farenheit.
  2. Line a 9-1/2 by 13-inch rimmed sheet pan with parchment paper.
  3. Wash and dry the greens and herbs. By the time you add them to the batter, they should be dry.
  4. Caramelize the onions: Heat the oil in a wide skillet over medium heat. Saute the onions until golden brown, approximately 15-25 minutes. Place the onions in a bowl and set aside.
  5. Prepare the garnish: In the same skillet, place the oil, barberries, grape molasses, and the water, and stir-fry for 4 minutes over medium heat. Barberries burn easily, so remove them as soon as they are soft and glistening. Transfer to a bowl and set aside.
  6. Prepare the batter: Break the eggs into a large mixing bowl. Add the baking powder, advieh, salt, pepper, and turmeric. Beat lightly with a fork. Add the garlic, lettuce, herbs, walnuts, flour, and caramelized onions, and fold in gently using a rubber spatula.
  7. Cook: Use a pastry to capture the oil from the skillet used to caramelize the onions (or use the 4 tblsp olive oil at the end of the ingredient list) and brush the parchment paper with oil. Pour in the batter. Gently shake the pan to even out the batter. Bake 15 minutes.
  8. Garnish: Remove from the oven and place on a cooling rack. Garnish with the caramelized barberries. Cut the kuku into serving-size pieces. Serve hot or at room temperature with lavash bread and yogurt.
Notes
  1. ADVIEH
  2. =======
  3. 1 tbsp dried rose petals (available on Amazon)
  4. 1 3-inch cinnamon stick, crushed (to help grind the other spices)
  5. 1 tbsp cardamom
  6. 1 tbsp cumin
  7. 1/2 tbsp ground golpar (also available on Amazon)
  8. Grind ingredients in a mortar and pestle. Use what is needed for the recipe above and store the rest in a cool dry place in an airtight container. (Yield: Approx. 1/4 cup)
Adapted from Joon, by Najmieh Batmanglij
Sea Sky & Table https://seaskyandtable.com/

Filed Under: Food, Recipes: Savory Tagged With: appetizer, dinner, eggs, food, herbs, lunch, middle eastern, savory, turmeric, vegetarian, video

Functional Foods: Turmeric & Lime Roast Chicken

August 5, 2016


Functional Foods - Turmeric & Lime Roast Chicken

The combination of turmeric and lime make this recipe ideal any time of year.  Its color is perfect for fall, yet lime makes it sparkle like summer.  Zest the limes used for the wet rub and use it in the wet rub.  Half a lime, an onion, garlic and bay leaf in the cavity keep the meat moist.  Remove them before serving and reserve for a pot of chicken soup.  If you can’t find fresh turmeric, dried turmeric works perfectly.  It is now a staple in our kitchen.  Recipe adapted from Joon, by Najmieh Batmanglij.

Turmeric & Lime Roast Chicken
2016-08-05 12:08:55
This is an easy recipe to try if you are looking for ways to incorporate turmeric into your diet. In this recipe, dried turmeric is actually easier to use than fresh as it's easier to rub evenly over the entire chicken, inside and out. The parchment paper makes serving and cleanup a breeze.
Write a review
Save Recipe
Print
Ingredients
  1. 1 chicken, 3 to 4 lbs.
  2. WET RUB
  3. ========
  4. 2 tbsp olive oil
  5. 2 limes, juiced and zested
  6. DRY RUB
  7. ========
  8. 1 tbsp sea salt
  9. 1 tbsp freshly ground pepper
  10. 2 tsp turmeric
  11. 1 tbsp herbes de Provence (See Note)
  12. 1 bay leaf
  13. STUFFING
  14. =========
  15. 1 small onion, peeled and halved
  16. 4 cloves garlic, peeled and crushed
  17. 1 lime, cut in half
  18. BASTE
  19. ======
  20. 1/4 c. olive oil
Instructions
  1. Preheat the oven to 450 degrees Farenheit.
  2. Lined a rimmed sheet pan with parchment paper.
  3. In a small bowl, combine all the dry rub ingredients and set aside.
  4. In another small bowl, combine the wet rub ingredients.
  5. Remove the giblet packet from the chicken, rinse the chicken inside and out, pat dry, and place in the lined sheet pan.
  6. Pour half of the wet rub mixture inside half outside. Rub all over to cover the entire chicken.
  7. Rub the dry rub mixture over the chicken, inside and out.
  8. Stuff the chicken with the onion, garlic, half a lime and a bay leaf.
  9. Cover with another sheet of parchment paper and roast for 1 hour. Remove the paper, drizzle with olive oil, and roast for another 30 minutes, uncovered, Remove from oven and baste the chicken.
  10. Carve and serve. This dish pairs beautifully with saffron & basmati rice. (See recipe)
Notes
  1. If you don't have pre-mixed herbes de Provence, crush 1 teaspoon each of rosemary, thyme, and sage with a mortar and pestle to yield the 1 tablespoon required for this recipe.
  2. This dish pairs beautifully with saffron and basmati rice, vegetables and a salad.
Adapted from Joon, by Natmieh Batmanglij
Sea Sky & Table https://seaskyandtable.com/

Filed Under: Food, Recipes: Savory Tagged With: chicken, dinner, food, Functional foods, lime, savory, turmeric

Madeleines

December 10, 2015

1777_2015-12-09_Madeleines_Blog, Featured

This is the easiest madeleine recipe yet! Lovely and lemony, it is as Larousse on Pastry promised, child’s play.

Madeleines
2016-07-30 17:03:28
Yields 12
The original recipe calls for 2/3 cup sugar, but you can reduce it to as little as 1/3 cup. For a slight variation, add 1/2 tsp almond extract.
Write a review
Save Recipe
Print
Prep Time
10 min
Cook Time
15 min
Prep Time
10 min
Cook Time
15 min
Ingredients
  1. 1 c. flour
  2. 1 tsp. baking power
  3. 7 tbsp. butter
  4. Zest of 1/4 lemon
  5. 2 eggs
  6. 2/3 c. sugar (or as little as 1/3 c.)
Instructions
  1. Preheat oven to 425 degrees.
  2. Lightly butter a 12-madeleine pan mold (for regular, not mini-madeleines).
  3. Sift the four and baking powder into a bowl.
  4. Melt the butter in a small saucepan and allow to cool.
  5. Beat the eggs 1 minute. Add the sugar and beat 4 more minutes. (They should be very frothy.)
  6. Add the flour and baking powder, then the butter and lemon zest, stirring constantly.
  7. Fill each madeleine mold to 2/3 full.
  8. Bake for 5 min @ 425 degrees, then lower to 400 degrees and bake for 10 minutes longer.
  9. Turn out the madeleines while still warm and allow them to cool.
By Larousse
Adapted from Larousse on Pastry
Sea Sky & Table https://seaskyandtable.com/

Filed Under: Food, Recipes: Sweet Tagged With: cookie, dessert, food, french cuisine, madeleines, madelines, sweet

Le Gateau Weekend

August 13, 2015

9520_Bay Leaf Pound Cake

      Crossing the San Francisco Bay Bridge for the first time, in a convertible with the top town, the scent was mesmerizing. “What is that smell,” I kept asking.

       “What smell?”

       “That smell, in the breeze. What is it? I know that smell.”

       Thank goodness I wasn’t driving, it was so distracting. Craning my neck out the passenger side window of the red Mustang convertible, hungry for more, my brain tried to connect identifiable memory with what my olfactory senses were inhaling, deeply. I knew that smell. It was so familiar. The synapse eluded me.

       The Bay Bridge is a long bridge. By the time we reached the end, my companion’s amusement at my inadvertent bloodhound imitation was waxing. As we approached terra firma, the scent surrounded us. My eyes closed, still searching memory banks.

       “What kind of tree is that?”  We were on solid ground now and huge, ginormous trees I had never seen before were breezing past us. Their perfume filled the air with subtle, earthy well-being.

       “Bay Leaf.”

       “That’s it! Bay leaf! We use it in beans and stews all the time. Holy moly! Those leaves are huge! No wonder Williams Sonoma was inspired to create such beautiful wreaths. They’re massive! Those are not the bay leaves we get at the supermarket. I never knew what they smelled like fresh.”

       “Mmmm.”

       Sitting back to relax against the convertible’s bucket seat, I closed my eyes again, allowing the scent to waft over me. When I opened my eyes, we were in wine country.

       Years later, reading David Lebovitz’ My Paris Kitchen: Recipes and Stories, I am once again mesmerized by the fragrance of bay leaf. Humble store-bought bay leaves are infused in the butter used to keep this pound cake moist. A few perfect leaves are buttered on one side and arranged on parchment paper to decorate the bottom of the loaf. Pound cake usually rises, though, and it would be a shame to level the top to serve it upside-down. Standing a leaf on its edge in the batter down the center identifies this heady beauty as something to talk about. Voila!

       It’s been 3 days since I baked what DL calls his gateau week-end.  I still smile when I bump into its subtle and mysterious fragrance.


Filed Under: Food, Recipes: Sweet Tagged With: bay leaf, cake, California, David Leibovitz' My Paris Kitchen, dessert, food, french cuisine, pound cake, sweet

Individual Chocolate Souffles

August 5, 2015


Simple and quick to prepare, these individual chocolate souffles, adapted from Irma Rombauer’s classic Joy of Cooking, are certain to delight. See the notes in the variation for tips on a recipe for two.

Individual Chocolate Souffles
2016-08-01 14:24:17
Serves 6
Souffles once intimated me. Not any more! These are quick and easy with ingredients that are in our kitchen on a regular basis. The original recipe called for rum, coffee or water for flavoring. I like to use rioja wine or cranberry juice.
Write a review
Save Recipe
Print
Cook Time
20 min
Cook Time
20 min
Ingredients
  1. 8 oz semisweet or bittersweet chocolate, chopped
  2. 4 tblsp (1/2 stick) unsalted butter
  3. 2 tblsp rioja wine, cranberry juice, rum, or coffee or water
  4. 6 large egg yolks
  5. 6 large egg whites, at room temperature
  6. Heaping 1/4 teaspoon cream of tartar
  7. 1/2 c sugar
Instructions
  1. Preheat oven to 375 degrees.
  2. Butter and sugar six 10- to 11-ounce ramekins and arrange on a baking sheet.
  3. Combine in a heatproof bowl: chocolate, butter, flavoring.
  4. Set the bowl in a skillet of hot (but not simmering water) and stir until the mixture is smooth. Let cool for 10 minutes, then...
  5. Whisk in egg yolks.
  6. Separately, in a mixer, beat the egg whites until foamy.
  7. Add the cream of tartar to the egg whiles and beat at high speed until soft peaks form.
  8. Gradually beat in the sugar and beat until the peaks are stiff but not dry.
  9. Using a large rubber spatula, stir one-third of the egg whites into the chocolate mixture, then gently fold in the remaining mixture.
  10. Divide the batter equally among the prepared ramekins and smooth the tops.
  11. Bake until risen and set, about 20 minutes.
  12. Optional: After bringing the souffles to the table, cut a slit in the top and drop a dollop of whipped cream on top.
Notes
  1. SWEET ENOUGH FOR TWO: Break out the electric hand mixer with a whisk attachment, butter and sugar two 3-1/2-inch ramekins, and follow the instructions above with these measurements: 1 egg; 1 tbsp. butter; 1 tbsp. sugar; 1-1/6 oz dark chocolate; pinch of cream of tartar; 1/4 tbsp. prepared coffee, red wine, or cranberry juice.
Adapted from The Joy of Cooking
Sea Sky & Table https://seaskyandtable.com/

Filed Under: Food, Recipes: Sweet Tagged With: chocolate, dessert, food, french cuisine, souffle, sweet

Cherry Clafoutis

August 1, 2015

9251_Cherry Clafoutis

When cherries are in season, this is my go-to dessert. Whether it’s presented in individual ramekins or family style in a baking dish, it always tastes like summer.  Adapted from Larousse on Pastry.

Cherry Clafoutis
2016-08-01 14:42:15
Serve warm in ramekins while the custard still has a little height to it; or cold any time from the baking dish.
Write a review
Save Recipe
Print
Ingredients
  1. 1 lb. black cherries
  2. 1/3 c. sugar
  3. 1 c. flour
  4. A pinch of salt
  5. 3 eggs
  6. 1-1/4 c. milk
  7. Butter for the mold(s)
Instructions
  1. Preheat the oven to 350 degrees. Butter a 10-1/2 inch baking dish or 8 individual ramekins (1/2 cup capacity).
  2. Wash the cherries and remove the stems. Slice each in half and remove the pits. Place them in a bowl, sprinkle with half the sugar, and stir to distribute the sugar evenly. Set aside for 30 minutes.
  3. Sift the flour into a bowl, add a pinch of salt and the rest of the sugar. Beat the eggs and add them to the mixture. Mix well. Add the milk and mix again.
  4. Lay the cherries in a baking dish, pour the batter over them and bake until a toothpick inserted in the center comes out clean. If using ramekins, this will take approximately 25 to 30 minutes. If using a baking dish, approximately 35 to 40 minutes.
  5. Remove from the oven and allow to cool slightly.
Notes
  1. The custard will pouf up in the oven and deflate quickly (i.e., in the time it took me to remove the ramekins from the oven and take a few pictures), but don't worry, it's not a soufflé, it's supposed to settle a bit.
  2. The Larousse recipe calls for confectioners' sugar sprinkled on top, and I keep trying it because I get the impression it's more authentic, but the conclusion is always the same - clafoutis is sweet enough on its own. If anything, add a small dollop of whipped cream, or drizzle a tiny bit of Beaujolais Syrup on top.
Adapted from Larousse on Pastry
Sea Sky & Table https://seaskyandtable.com/

Filed Under: Food, Recipes: Sweet Tagged With: cherries, cherry, dessert, food, french cuisine, fruit, sweet

Eggplant Caponata and Roasted Tomato Tart

August 1, 2015

8924_Eggplant and Tomato Tart

This recipe packs a lot of flavor in small bites – pureed Italian caponata for the eggplant filling, cream cheese to offset the smokiness of paprika in the tart shell, and fresh oregano on the roasted grape tomatoes. Serve with a salad of mixed greens with lemon vinaigrette.  Pastry and roasted grape tomatoes adapted from Tarts, Sweet and Savory by Maxine Clark; caponata adapted from the Italian Kitchen Bible by Kate Whiteman, Jeni Wright and Angela Boggiano.

Caponata and Roasted Grape Tomato Tart
2016-08-01 14:39:15
Try the individual components alone, in a salad, or as a side. Put them together for a tastebud adventure.
Write a review
Save Recipe
Print
Ingredients
  1. TART PASTRY
  2. ========================
  3. 6 tblsp butter
  4. 1 c. plus 2 tblsp. flour
  5. 1/2 tsp. smoked paprika
  6. 1/2 tsp. dry mustard powder
  7. 1/2 c. cream cheese
  8. 1 large egg yolk
  9. 2 tblsp. ice water
  10. sea salt and freshly ground pepper
  11. ROASTED GRAPE TOMATOES
  12. =========================
  13. 2 pints grape tomatoes
  14. 2 garlic cloves, minced
  15. 1 to 2 tblsp. chopped fresh oregano
  16. 1/4 c. olive oil
  17. sea salt and freshly ground pepper
  18. CAPONATA FILLING
  19. =========================
  20. 1 large eggplant (about 1-1/2 lb.)
  21. 4 tbsp. olive oil
  22. grated rind and juice of 1 lemon
  23. 2 tbsp. capers
  24. 12 pimiento-stuffed olives
  25. 2 tbsp. chopped fresh parsley
  26. salt and freshly ground pepper
Instructions
  1. TART SHELL: Preheat the oven to 400 degrees.
  2. Place the flour, paprika, mustard powder, salt, pepper, and flour in the bowl of a food processor and pulse once to blend.
  3. Add the butter and pulse quickly until the mixture is very coarse and crumbly.
  4. Add the cream cheese and pulse a few times, so that the mixture is still coarse and crumbly.
  5. Mix the egg with 2 tblsp. ice water and pour in slowly, pulsing until just mixed into a soft dough.
  6. Working quickly, form the dough into an oblong (or round) shape about 1-inch thick, wrap in plastic and refrigerate for at least 30 minutes (or overnight).
  7. Roll out the dough, place in the tart shell, and refrigerate or freeze for another 15 minutes.
  8. Prick the bottom of the shell with a fork, line the shell with aluminum foil, place pie weights or dried beans on the foil, and bake blind for 10 - 12 minutes. Place on a rack to cool.
  9. SLOW-ROASTED TOMATOES: Place the tomatoes on a baking sheet in a single layer.
  10. Combine the oil, garlic, oregano, salt and pepper and brush over the tomatoes.
  11. Bake slowly for approximately 60 minutes. The tomatoes should shrink only slightly and should remain a bright red color. (They will cook another 25 minutes when the tart is assembled.)
  12. The tomatoes can be roasted up to a day ahead. Simply ensure they are brushed with oil and covered tightly in the refrigerator.
  13. Reduce the oven temperature to 350 degrees.
  14. EGGPLANT CAPONATA FILLING: Cut the eggplant into 1-inch cubes.
  15. Heat the olive oil in a large skillet. Cook the eggplant cubes over medium heat in two batches for about 10 minutes, tossing regularly, until golden and softened.
  16. Drain on paper towels and sprinkle with salt.
  17. Place the eggplant cubes in a large bowl. Toss with the lemon rind and juice, capers, olives, and chopped parsley. Season with salt and pepper to taste.
  18. Puree half the mixture for the tart filling and refrigerate the rest to serve with a salad.
  19. ASSEMBLY: Break an egg into a bowl, whisk with a fork and add the eggplant puree. Mix until blended.
  20. Place the eggplant puree mix into the half-baked tart shell. The mixture to reach just short of the top.
  21. Arrange roasted grape tomatoes on the tart.
  22. Bake at 350 degrees for 25 minutes or until set.
  23. Remove from the oven and let cool. Brush lightly with olive oil and serve.
Adapted from Tarts Savory and Sweet; and The Italian Kitchen Bible
Sea Sky & Table https://seaskyandtable.com/

Filed Under: Food, Recipes: Savory Tagged With: caponata, eggplant, food, french, italian cuisine, savory, tart, tomatoes, vegetables

Carrot and Ginger Soup

July 31, 2015

8709_2015-07-18_Carrot & Ginger Soup_Blog, Featured

I love soup. The cilantro added at the very end adds a splash of color and complements the ginger well.  Adapted from the Silver Palate Good Times Cookbook by Julie Rosso and Sheila Lukins.

Carrot and Ginger Soup
2016-08-01 14:33:16
Write a review
Save Recipe
Print
Ingredients
  1. 6 tbsp. (3/4 stick) unsalted butter
  2. 1 large yellow onion, chopped
  3. 1/4 c. finely chopped fresh ginger root
  4. 3 cloves garlic, sliced
  5. 8 cups chicken stock
  6. 1-1/2 pounds carrots, peeled and cut into 1/2-inch pieces
  7. 2 tblsp. fresh lemon juice
  8. 1/8 tsp curry powder
  9. Salt and freshly ground pepper to taste
  10. Chopped, well-washed cilantro for garnish
Instructions
  1. Melt the butter in a large stock pot over medium heat.
  2. Add the onion, ginger, and garlic and saute for 15-20 minutes.
  3. Add the stock and carrots. Heat to boiling. Reduce heat and simmer, uncovered, over medium heat until the carrots are very tender, about 45 minutes.
  4. Puree the soup. Season with lemon juice, curry powder and salt and pepper to taste. Sprinkle with chopped cilantro.
  5. Serve hot or chilled.
Adapted from Silver Palate Good Times Cookbook
Sea Sky & Table https://seaskyandtable.com/

Filed Under: Food, Recipes: Savory Tagged With: carrots, cold season, dinner, food, ginger, healthy, lunch, nutricious, savory, soup

Zucchini Tea Bread

July 31, 2015

9223_2015-07-30_Zucchini Bread_Blog, Featured


The first time my mother made this moist tea bread, I scrunched my nose at the thought of zucchini masquerading as the basis for anything resembling cake. But it was delicious! I still love the crunchiness of the walnuts and the sesame seeds, not to mention the license to indulge in a healthy snack with a cold glass of milk.  Adapted from the California Heritage Cookbook.

Zucchini Tea Bread
2016-08-01 14:29:35
This low-salt adaptation yields 1 loaf or 12 cupcakes. It can be made a day ahead, refrigerated for up to 2 weeks, or frozen for 3 months. Double the recipe for 2 loaves.
Write a review
Save Recipe
Print
Ingredients
  1. 2 eggs
  2. 1/3 c. salad oil
  3. 1/2 c. less 2 tbs. granulated sugar
  4. 1-1/2 tsp. maple syrup
  5. 1 c. shredded zucchini (approx. 2 small zucchini)
  6. 1-1/4 c. sifted flour
  7. 1/4 c. wheat germ
  8. 1/2 tsp. salt
  9. 1 tsp. baking soda
  10. 1/4 tsp. baking powder
  11. 1/c. finely chopped walnuts
  12. 3 tbsp. sesame seeds
Instructions
  1. Preheat the oven to 350 degrees. Lightly butter and flour a 9x5x3-inch loaf pan; or 2-3 mini loaf pans; or tins for a total of 12 regular-sized muffins. Set aside.
  2. In a large bowl, mix the sifted flour, wheat germ, salt, baking soda, baking powder, and walnuts. Set aside.
  3. In a mixer, beat the eggs until blended, then add the salad oil, sugar, and maple syrup, and continue beating until thick and foamy.
  4. Sir in the zucchini with a spatula.
  5. Stir in the flour mixture, just enough to blend.
  6. Ladle the batter into the prepared loaf pan or muffin tins. Sprinkle the sesame seeds over the top.
  7. Bake 30 minutes for mini-loaves; 50 minutes for muffins; or 1 hour for a full loaf; or until a toothpick inserted in the center comes out clean and dry.
  8. Cool in the pan for 10 minutes. Turn out on a rack to cool completely. Wrap in foil or plastic wrap and store 1 day before serving.
Adapted from The California Heritage Cookbook
Sea Sky & Table https://seaskyandtable.com/

Filed Under: Food, Recipes: Sweet Tagged With: breakfast, food, muffins, snack sweet, tea bread, vegetable, walnuts, zucchini

Carrot Cake

May 8, 2015

9773_2015-08-22c_Carrot Cake Muffins_Blog, Featured

There are three carrot cake recipes that I rely upon depending on whether a) whole wheat flour is on hand; and b) the audience prefers healthy over sweet. For myself, the recipe with whole wheat flour, pineapple and walnuts from the California Heritage Cookbook is always my favorite. The whole wheat provides depth and a little healthy fuel to burn.

In the absence of whole wheat flour, David Lebovitz’ version from My Paris Kitchen takes the cake, especially in winter. The allspice and cinnamon make it particularly perfect in winter.

For the sweet tooth, I recommend Larousse on Pastry‘s recipe. It’s not overly sweet, but it is more of a dessert than a healthy snack.

Carrot Cake
2016-08-01 14:59:23
Another favorite from our mother's kitchen. The whole wheat adds makes it extra healthy and delicious!
Write a review
Save Recipe
Print
Ingredients
  1. 1-1/4 c. salad oil
  2. 1 c. brown sugar, packed (can be reduced to half)
  3. 1 c. granulated sugar (can be reduced to half)
  4. 4 eggs
  5. 1 c. all-purpose flour
  6. 1 c. less 2 tblsp. whole wheat flour
  7. 1 tsp salt (can be reduced to half)
  8. 2 tsp baking soda
  9. 2 tsp baking powder
  10. 2 tsp cinnamon
  11. 3 c. finely shredded raw carrots, packed
  12. 8-1/2 oz. crushed pineapple, drained (optional)
  13. 1/2 c. finely chopped walnuts (optional)
Instructions
  1. Preheat the oven to 350 degrees.
  2. Grease and lightly flour two 9-inch round cake pans (or 18 muffin tins).
  3. In a large bowl, sift together the two flours, salt, baking soda, baking powder, and cinnamon.
  4. In a mixer, blend the salad oil, brown sugar, and granulated sugar.
  5. Add the eggs, one at a time, beating until blended.
  6. Add the flour, one-third at a time, beating just until blended.
  7. Fold in the carrots, pineapple, and walnuts.
  8. Bake for 35-40 minutes or until a toothpick inserted in the center comes out clean.
  9. Cool for 10 minutes before turning out to a rack to cool completely.
  10. Optional: Unfrosted, this carrot cake may be wrapped and refrigerated for 5-6 days or froen for 2-3 months. Frosted, the cake will last in the refrigerator for up to a week.
  11. Optional: Frost with Lemon Cream Cheese Frosting.
Notes
  1. Lemon Cream Cheese Frosting
  2. 8 oz cream cheese, softened
  3. 1/4 c. butter
  4. 2 c. sifted confectioners sugar
  5. 1-1/2 tsp vanilla
  6. 1 tblsp grated lemon rind
  7. In a large mixing bowl, cream the butter and cream cheese until fluffy. Blend in the confectioners' sugar. Stir in the vanilla and lemon rind.
Sea Sky & Table https://seaskyandtable.com/

Filed Under: Food, Recipes: Sweet Tagged With: cake, carrots, dessert, food, snack, sweet, vegetable

Bittersweet Chocolate Icing

December 25, 2014

7781_Low-Fat Milk, Dark Chocolate, and a Whisk


Delicious with Christmas Spice Cake!  Adapted from Maida Heatter’s Cakes.

Bittersweet Chocolate Icing
2016-08-01 14:20:03
This recipe accompanied Maida Heatter's recipe for Tomato Soup Cake, which I refer to as Christmas Spice Cake because most people can't conceive of tomato soup as a cake ingredient. Yet it is delicious. The soup adds moisture in a nutricious way to a recipe fragranced with cinnamon, cloves, nutmeg and cocoa. To me, this cake spells Christmas.
Write a review
Save Recipe
Print
Ingredients
  1. 1/2 c. whipping cream
  2. 3 oz. unsweetened chocolate, chopped coarsely
  3. 5 oz. milk chocolate, chopped coarsely
Instructions
  1. Place cream in a small saucepan over moderate heat. Let cook uncovered, until there is a slight wrinkled skin on top or small bubbles form around the edges.
  2. Add the unsweetened cohocolate and stir until it is almost all melted.
  3. Transfer the mixture to the small bowl of an electric mixer. Beat at medium-high for 1 to 2 minutes, until the mixture becomes beautifully smooth, shiny and thick. Then, without waiting, pour the icing on the cake and quickly spread it over the top with a long, narrow spatula.
Adapted from a Maida Heatter recipe.
Sea Sky & Table https://seaskyandtable.com/

Filed Under: Food, Recipes: Sweet Tagged With: cake, chocolate, dessert, food, frosting, glaze, icing, milk, sweet

Pear Bardaloue

July 15, 2014

6655_2013-01-06_Pear Tart (Bardaloue)_Blog2_Blog, Featured


My Dad loved pears.  I had made this tart for him a few years ago and had purchased the ingredients to make it for him again over the winter break of 2012. He passed away that Thanksgiving weekend. Over the holidays, I made it in his honor and invited the local branch of our family to share it. They loved it, and I know Dad would have, too.  Adapted from Larousse on Pastry.

Pear Bardaloue
2016-08-01 14:11:49
Easier than you might think and absolutely gorgeous. This fragrant dessert is redolent of pears, almonds, autumn, and good friends.
Write a review
Save Recipe
Print
Ingredients
  1. TART SHELL
  2. ==========
  3. 7 tbsp. butter
  4. 1-1/4 c. sifted flour
  5. A pinch of salt
  6. 2 tbsp.. sugar
  7. 5 tbsp. ice cold water
  8. ALMOND CREAM
  9. ==============
  10. 1/4 c. butter
  11. 1 small egg
  12. 5 tbsp. sugar
  13. 7/8 c. ground almonds
  14. PEARS
  15. ======
  16. 10 to 12 canned pear halves (about 4 cans)
Instructions
  1. PREPARE THE CRUST: Cut the butter into very small pieces. Put the flour in a bowl and make a well in the center. Add the salt, the sugar, and the butter. Quickly rub in the ingredients with your fingertips. Add some water to form a dough. Knead until supple. (It should be neither too sticky, nor too soft.) Dust your work surface with flour, lay the dough on it and flatten it with the heel of your hand. (Do not knead at this stage.) Shape the dough into a ball, wrap in plastic wrap and allow to rest for at least 30 minutes.
  2. WHILE THE DOUGH IS RESTING: Cut the butter for the almond cream into pieces and allow to soften at room temperature.
  3. Drain the pears and cut lengthwise into thin slices.
  4. Preheat the oven to 375 degrees.
  5. PREPARE THE ALMOND CREAM: Break the egg into a bowl, add the butter and sugar and beat by hand until you obtain a smooth cream. Beat in the ground almonds.
  6. Roll out the dough and place in a 9-inch tart shell Pour in the almond cream. Arrange the pear slices on top.
  7. Bake for 30 minutes.
  8. Allow to cool slightly before turning out.
  9. Serve cold or at room temperature.
Notes
  1. This pastry crust is best when created by hand (not in a food processor). If you are pressed for time or just don't want to work the dough with your hands, try the Pate Brisee recipe elsewhere on this site.
  2. If the tart has cooked for 30 minutes and a toothpick inserted in the center comes out clean - but the almond cream filling is not golden brown - try sprinkling a little sugar on the cream (not the pears) and using a crème brullee torch - very lightly and briefly - to brown the top.
Adapted from Larousse on Pastry
Sea Sky & Table https://seaskyandtable.com/

Filed Under: Food, Recipes: Sweet Tagged With: almond, autumn, baking, bardaloue, dessert, food, french cuisine, pears, sweet, tart

Pate Brisèe au Sucre

July 8, 2014

8634_2015-07-08_Tart Pans_Blog, Featured

This recipe is adapted from French Tarts: 50 Savory and Sweet Recipes by Linda Dannenberg.  I found it at William Sonoma, loved it, and proceeded to test every recipe on my loving and appreciative parents.  It’s great for fruit tarts and travels well.

Pâte Brisée au Sucre
2016-08-01 13:53:26
Serves 8
The milk and sugar in this recipe make a sweeter, flakier version of the classic pâte brisée which is great for fruit tarts. This version uses less sugar (1/3 cup instead of 1/2 cup) and less than the full 1/4 tsp. salt.
Write a review
Save Recipe
Print
Prep Time
1 hr 30 min
Cook Time
20 min
Prep Time
1 hr 30 min
Cook Time
20 min
Ingredients
  1. 1 1/2 c. all-purpose flour
  2. 1 stick (4 oz) unsalted butter, very cold
  3. 1/8 to 1/4 tsp. salt
  4. 1/8 tsp. baking powder
  5. 1/3 c. sugar
  6. 4 tbsp. (1/4 c.) ice cold milk
Instructions
  1. Cut the butter into 7-8 pieces.
  2. Place all the ingredients except the milk in a food processor fitted with the steel blade.
  3. Process until mixture has the consistency of coarse meal (5 – 10 seconds).
  4. With the machine running, pour the milk through the feed tube one tablespoon at a time in a steady stream. Stop processing before the dough forms a ball to ensure tender, flaky pastry.
  5. From the pastry into a flat (1- to 1-1/2" high) disk.
  6. Wrap the disk in plastic and refrigerate at least one hour.
  7. Roll out & arrange in tart pan.
  8. Cover with plastic wrap and refrigerate for another hour.
  9. Preheat oven to 375 degrees.
  10. For a partially-baked tart shell, Bake 8 minutes in the center of the oven. Remove weights and foil and bake for 2 more minutes.
  11. For a fully baked shell, Bake 8 minutes, remove foil and weights, then bake for 15 to 20 minutes, until light golden brown all over.
  12. Cool on a wire rack before filling.
Notes
  1. TIPS
  2. Makes one large tart shell; or 1 small shell and 2-3 tartlets; or 8 tartlets.
  3. In a warm climate (or during the summer), when it’s difficult to keep things cold, try keeping butter frozen. Use a strong knife with a wide blade to cut it into pieces.
  4. Un-rolled pastry can be frozen. Remove from food processor, flatten into a disk about ½” to 1 “ high, enclose in plastic wrap, and let it rest in the refrigerator for about 20 minutes before freezing. When ready to roll, place pastry in a second plastic bag in the refrigerator to defrost for 1-2 hours before rolling. The second bag captures condensation, protecting the dough from becoming soggy.
  5. Once pastry is arranged in the shell, press the rolling pin across the top to achieve a perfect edge.
  6. Before placing in the oven, pierce the shell with a fork 2-3 times, cover with foil, and place pie weights (or beans) on the foil to keep the pastry from bubbling. Remove foil and weights when placing the tart back in the oven for a fully-baked shell.
  7. For a savory tart shell, eliminate the sugar.
Adapted from French Tarts by Linda Dannenberg
Sea Sky & Table https://seaskyandtable.com/

Filed Under: Food, Recipes: Sweet Tagged With: crust, food, french cuisine, pies, shell, sweet, tarts

4-Grain Cinnamon Pancakes

July 7, 2014

0206_2014-03-23_Pancakes on black granite_Blog_Blog, Featured


My favorite recipe for delicious, healthy pancakes! The ingredient list below uses half the sugar, salt, and honey and twice the cinnamon recommended in the original recipe.  Adapted from the Joy of Cooking.

4-Grain Cinnamon Pancakes
2016-08-01 13:45:27
Serves 4
Write a review
Save Recipe
Print
Prep Time
10 min
Cook Time
10 min
Prep Time
10 min
Cook Time
10 min
Ingredients
  1. 1 c. whole-wheat flour
  2. 3/4 c. all-purpose flour
  3. 1/2 c. cornmeal
  4. 1/4 c. rolled oats
  5. 1 tblsp. sugar
  6. 2 tsp. baking powder
  7. 1/2 tsp. salt
  8. 1/2 tsp. baking soda
  9. 1 tsp. cinnamon
  10. Pinch of freshly grated nutmeg
  11. 1-3/4 c. milk
  12. 4 tblsp. (1/2 stick) butter, melted
  13. 1/8 cup honey
  14. 3 large eggs
Instructions
  1. Preheat a skillet. (Regular-sized for pancakes; or for flapjacks, use a crepe or omelet skillet.)
  2. Whisk the dry ingredients in a bowl.
  3. In a separate bowl, whisk the wet ingredients to mix.
  4. Pour the wet ingredients over the dry ingredients.
  5. Mix until just combined.
  6. Spoon (or ladle) batter onto hot, buttered skillet.
  7. Cook until top of each pancack is speckled with bubbles and some bubbles have popped. Lift pancake, butter skillet again and cook pancake on other side until underside is lightly browned.
  8. Serve immediately or keep warm in a 200-degree oven while you finish cooking the rest.
Notes
  1. VARIATIONS
  2. - Thinly sliced apples and raisins added directly to the batter before cooking;
  3. - Pears and pecans;
  4. - Summer fruit;
  5. - Serve with maple syrup, more cinnamon & thinly sliced orange rounds for garnish.
Adapted from The Joy of Cooking
Sea Sky & Table https://seaskyandtable.com/

Filed Under: Food, Recipes: Sweet Tagged With: 4-grain, breakfast, food, grains, pancakes, savory

HELLO WORLD!

July 3, 2014

0441_2014-03-29_Loukoumi & tea (downloaded from Photoshelter)

Welcome to Sea, Sky and Table – exploring the intersections between travel, sailing, architecture and food.

Filed Under: Food, Recipes: Sweet, Travel Tagged With: beverage, food, loukoumi, rosebud, sweet, tea

Primary Sidebar

Antarctica is for photographers

https://www.youtube.com/watch?v=weSBhWlnYzQ

Have a group or destination in mind? Contact us.

Sea Sky & Table Webinars

Plan now to travel again.

  • Email
  • Facebook
  • Instagram

Travel Videos

  • Vimeo

Food Videos

  • Vimeo

Search

Categories

Archives

Footer

Connect

Share

  • Facebook
  • Instagram
  • LinkedIn
  • Vimeo

Request a print from the archives at www.mlramos.photography

  • Email

Print, Metal or Acrylic?

Custom framing and mounting by Fine Art America.

Copyright © 2025 · by Shay Bocks · Built on the Genesis Framework · Powered by WordPress